// the first state is the current state in store, and the function return // a new state after action. constcounterReducer = (state, action) => { if (action.type === 'INCREMENT') { return state + 1; } elseif (action.type === 'DECREMENT') { return state - 1; } elseif (action.type === 'ZERO') { return0; }
function createStore<T>(reducer: Reducer<T>, initialState?: T): Store<T> { // store reduce and state to local variable let currentReducer = reducer; letcurrentState: T | undefined = initialState; // store listen(function that subscribe to this store) in a map id -> func letcurrentListeners: Map<number, ListenerCallback> | null = newMap(); // a id that will assign to the listener let listenerIdCounter = 0;
function createStore<T>(reducer: Reducer<T>, initialState?: T): Store<T> { // store reduce and state to local variable let currentReducer = reducer; letcurrentState: T | undefined = initialState; // store listen(function that subscribe to this store) in a map id -> func letcurrentListeners: Map<number, ListenerCallback> | null = newMap(); // a id that will assign to the listener let listenerIdCounter = 0;
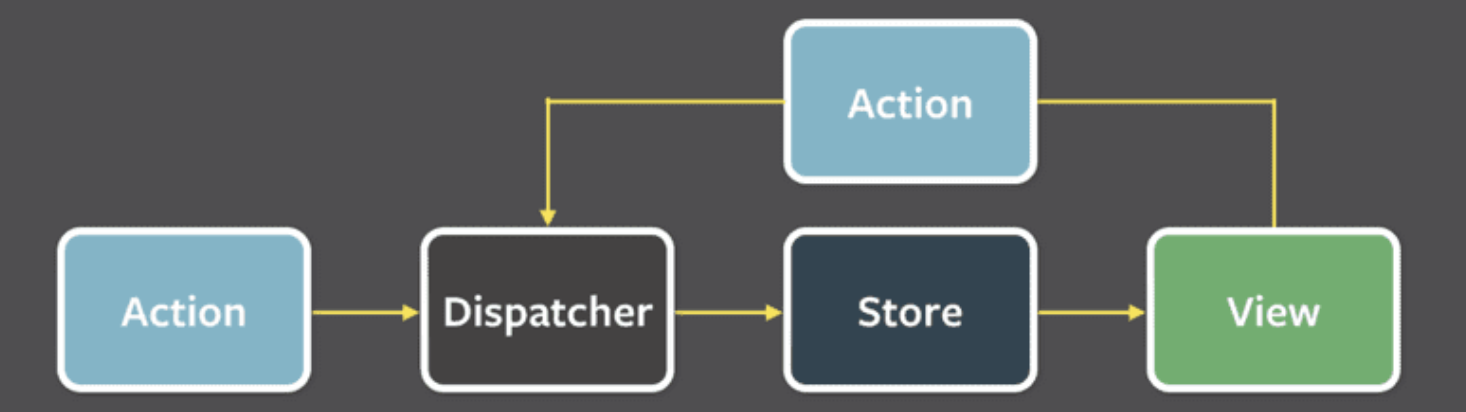
functiondispatch(action: Action) { // We will call reducer using action and current state, and update current state currentState = currentReducer(currentState, action); // Call all listener one by one after update the state currentListeners.forEach(listener => { listener(); }); }
exportinterfaceSubscription { // add children subscription, thus a tree structure is formed addNestedSub: (listener: VoidFunc) =>VoidFunc // propagate the information to its children nodes notifyNestedSubs: VoidFunc // check whether the node is subscribed isSubscribed: () =>boolean // do something when the node is notified handleChangeWrapper: VoidFunc // this is for component to attach their function to this node so that handleChangeWrapper can call it onStateChange?: VoidFunc | null // try to subscribe to a store trySubscribe: VoidFunc // unsubscribe the node for garbage collection tryUnsubscribe: VoidFunc }
exportfunctioncreateSubscription(store: any, parentSub?: Subscription) { // for store unsubscribe function letunsubscribe: VoidFunc | undefined; // for store the listeners // for simplification we don't implement the listener methods here, we will do some wishful thinking and assume that we have a ListenerCollection class which is a link list that stores all the listeners(callback) letlisteners: ListenerCollection; // Is this specific subscription subscribed (or only nested ones?) let selfSubscribed = false;
functionisSubscribed() { return selfSubscribed; }
functiontrySubscribe() { // if it is a root node, subscribe its method to store // else add to parent's listeners if (!unsubscribe) { unsubscribe = parentSub ? parentSub.addNestedSub(handleChangeWrapper) : store.subscribe(handleChangeWrapper); // create a empty link list of listener for preparing a space for its children nodes listeners = createListenerCollection(); } }
functiontryUnsubscribe() { if (unsubscribe) { // call unsubscribe method, unsubscribe from store or parent listeners unsubscribe(); unsubscribe = undefined; // clear its listeners listeners.clear(); listeners = null; } } // for children nodes to add their listener to parent node functionaddNestedSub(listener: () => void) { const cleanupListener = listeners.subscribe(listener);
return() => { // unsubscribe tryUnsubscribe(); // clear its listeners cleanupListener(); }; } // force rerender functionhandleChangeWrapper() { subscription.onStateChange(); }
functionProvider({store, children}){ // provider will create a subscription when store with root is changed. const contextValue = useMemo(() => { const subscription = newSubscription(store); subscription.onStateChange = subscription.notifyNestedSubs; return { store, subscription, }; }, [store]); // get initial state const previousState = useMemo(() => store.getState(), [store]);
// when previousState or contextValue change, try to subscribe again useLayoutEffect(() => { const { subscription } = contextValue // subscribe to new store subscription.trySubscribe() // if the state is changed, notify listeners if (previousState !== store.getState()) { subscription.notifyNestedSubs() }
return ( // inject subscription and store to children nodes <ReactReduxContext.Providervalue={contextValue}>{children}</ReactReduxContext.Provider> ); }
useSelector
现在我们可以在子组件中获取 store 和根订阅了,接下来实现 useSelector hook,它向订阅树中添加一个订阅,并在状态改变时强制组件重新渲染。
这里我们使用 useReducer 来通知组件进行重新渲染。
1 2 3 4 5 6
functionMyComponent() { // when dispatch is call, the component will rerender const [state, dispatch] = useReducer((s) => s + 1);
// whenever the state in store is changed, update the state and inform a rerender. // a selector callback for filter the state we want, equalityFn is for compare state change, here we use strictly equal === functionuseSelector(selector, equalityFn = (a, b) => a === b) { // get store and root subscription from context const { store, subscription: contextSub } = useContext(ReactReduxContext); // utilize the forceRender function for rerender const [, forceRender] = useReducer((s) => s + 1, 0); // create a new subscription for the component that call this hook with root subscription const subscription = useMemo(() =>newSubscription(store, contextSub), [ store, contextSub, ]); // get current state when re-render const storeState = store.getState(); // store selected state let selectedState; // cache selector, store state, selected state when every time render const latestSelector = useRef(); const latestStoreState = useRef(); const latestSelectedState = useRef(); useLayoutEffect(() => { latestSelector.current = selector; latestStoreState.current = storeState; latestSelectedState.current = selectedState; });
// if the cache is needed to update if ( selector !== latestSelector.current || storeState !== latestStoreState.current ) { // calculate new selected state const newSelectedState = selector(storeState); // if new selected state is not equal to the previous state if ( latestSelectedState.current === undefined || !equalityFn(newSelectedState, latestSelectedState.current) ) { // update state selectedState = newSelectedState } else { // use previous state selectedState = latestSelectedState.current } } else { // use previous state selectedState = latestSelectedState.current }
// attach checkForUpdates to the subscription's onStateChange //Every time subscriptions are updated, checkForUpdates will be called useLayoutEffect(() => { // compare store state with current state // if it is not equal, update current state // force re-render the component functioncheckForUpdates() { try { const newStoreState = store.getState(); const newSelectedState = latestSelector.current(newStoreState);
if (equalityFn(newSelectedState, latestSelectedState.current)) { return; }