🌑

React 服务器组件内部原理(源码解析)

Read in English

什么是 React 服务器组件(RSC)?

React 服务器组件是 React 的一项新特性,它允许服务端与客户端(浏览器)协同渲染 React 应用。简而言之,它将部分渲染工作移交给服务端,以提升整体性能。

React 元素树的典型构建流程

为了更好地理解为什么需要将渲染工作移到服务端,让我们先看看客户端渲染是如何构建 React 元素树(JSX)的:

1
2
3
4
5
6
7
8
9
10
11
12
13
14
15
16
17
18
19
20
// App Component
function App() {
return (
<div>
<ComponentA />
<ComponentB />
</div>
);
}

// ComponentA
function ComponentA() {
return <h1 onClick={() => alert("cool!")}>Hello from Component A</h1>;
}

// ComponentB
function ComponentB() {
const data = await fetchDataApi();
return <div>{data} fetched from Component B</div>;
}

上述组件在经过 React.createElement 渲染后,会被转换为虚拟 DOM(React 元素树):

1
2
3
4
5
6
7
8
9
10
11
12
13
14
15
16
17
18
19
20
21
22
23
24
25
26
27
28
29
30
const App = {
$$typeof: Symbol(react.element),
type: "div",
props: {
children: [
{
$$typeof: Symbol(react.element),
type: ComponentA,
props: {
children: [
$$typeof: Symbol(react.element),
type: "h1",
props: {
onClick: () => alert("cool!")
},
]
},
},
{
$$typeof: Symbol(react.element),
type: ComponentB,
props: {
children: [
// ...
]
},
}
]
},
}

然后 ReactDOM.render 会将这棵 React 元素树渲染为 HTML 格式并挂载到页面上。

这里有两点需要注意:

  1. 整棵树的构建过程都在浏览器中完成:这意味着如果某个组件包含重逻辑,比如 ComponentBfetchData,它会拖慢树的构建速度,并占用浏览器资源。
  2. 树中存在函数(type 字段和 onClick 属性):这导致序列化(将树转换为 JSON 字符串)变得不可行。

RSC 的 React 元素树构建流程

RSC 通过将计算密集型组件在服务端渲染(服务器组件),而将包含交互逻辑的组件留在客户端处理(客户端组件),从而提升性能。

RSC 1

当客户端请求一个服务器组件时,服务端会先构建 React 元素树,解析树上所有的服务器组件,跳过所有客户端组件,并为它们留下占位符,告知客户端在浏览器中填充(后续我们会详细讲解具体实现)。

因此,当用户打开一个使用 RSC 构建的页面时,通常会先看到服务器组件渲染的内容,然后是包含交互逻辑的组件渲染。

RSC 与 SSR 有什么区别?

还有一个容易与 RSC 混淆的概念,就是 SSR(服务端渲染)。虽然它们都在服务端执行部分工作,但两者有着本质区别。

主要区别在于粒度。SSR 在每次请求时在服务端渲染整个页面,而 RSC 是每次请求渲染一个组件,并请求客户端填充组件内的所有占位符来完成渲染。

换句话说,SSR 的输出是 HTML,而 RSC 的输出是 React 元素树。

在 SSR 中,客户端获取 HTML 后,会使用 hydrate(reactNode, domNode, callback?) 将 HTML 与 React 节点关联,使 React 能够接管 DOM(启用交互事件)。而 RSC 不需要 hydrate 过程,因为客户端组件直接在浏览器中渲染。

为什么需要 RSC?

那么 RSC 有哪些好处呢?浏览器非常适合让 React 应用具备交互性——你可以安装事件处理器、追踪状态、根据事件更新 React 树、高效地更新 DOM。但在以下场景中,React 服务器组件可能是更好的选择:

  1. 渲染数据切片(大量数据获取):在服务端渲染组件可以让你直接访问数据,无需经过各种公共 API 端点。如果组件只需要一小部分数据,还可以减少客户端请求的包体积,因为只返回所需的数据。
  2. 访问敏感逻辑和数据:服务器组件存储并运行在服务端,这意味着你无需将数据和逻辑暴露给公众,安全性更高。
  3. 加载重量级代码模块:当别人绞尽脑汁思考如何用有限的浏览器资源加载重量级代码模块(比如使用 Service Worker)时,你只需将代码放在服务器上。服务器比浏览器拥有更丰富的资源,更具可扩展性和稳定性。

组成部分

废话不多说,让我们开始介绍 React(及其他框架)是如何实现 RSC 的。为了控制复杂度,我们将 RSC 系统拆分为几个组成部分,逐一简化并构建。

序列化

使用 RSC 的页面,其生命周期始终从服务端开始——服务端会渲染一棵不完整的可序列化 React 元素树并发送给客户端,让客户端填充该树并渲染为 HTML。本节我们先看看服务端是如何渲染可序列化 React 元素树的。

  • 区分服务器组件和客户端组件:为了正确处理组件,我们需要一种方式来区分服务器/客户端组件。React 团队基于文件扩展名来定义:.server.jsx.client.jsx。这种定义方式便于人类和打包工具加以区分。

我们对之前的例子稍作修改,使用 RSC 如下:

1
2
3
4
5
6
7
8
9
10
11
12
13
14
15
16
17
18
19
20
// App.server.jsx
function App() {
return (
<div>
<ComponentA />
<ComponentB />
</div>
);
}

// ComponentA.client.jsx
function ComponentA() {
return <h1 onClick={() => alert("cool!")}>Hello from Component A</h1>;
}

// ComponentB.server.jsx
function ComponentB() {
const data = await fetchDataApi();
return <div>{data} fetched from Component B</div>;
}

序列化的输出如下:

1
2
3
4
5
6
7
8
9
10
11
12
13
14
15
16
17
18
19
20
21
22
23
24
25
26
27
28
29
30
31
32
const App = {
$$typeof: Symbol(react.element),
type: "div",
props: {
children: [
// ComponentA client component
{
$$typeof: Symbol(react.element),
type: ComponentA,
props: {
children: [
$$typeof: Symbol(react.element),
type: "h1",
props: {
onClick: () => alert("cool!")
},
]
},
},
// ComponentB server component
{
$$typeof: Symbol(react.element),
type: ComponentB,
props: {
children: [
// ...
]
},
}
]
},
}

这里有两个地方无法直接序列化

  1. type 字段:当 type 是 React 组件时,它是一个函数,无法进行 JSON 序列化(因为函数与内存耦合)。
  2. 客户端组件的 props:客户端组件可能包含 onClick: () => alert("cool!") 这样的函数,同样无法进行 JSON 序列化。

为了能 JSON 序列化一切,React 向 JSON.stringify 传入了一个 replacer 函数,用来处理 type 函数引用,并将客户端组件替换为占位符。可以查看源码 resolveModelToJSON

这里我创建了一个简化版本来帮助你理解:

1
2
3
4
5
6
7
8
9
10
11
12
13
14
15
16
17
18
19
20
21
22
23
24
25
26
27
28
29
30
31
32
33
34
35
36
37
38
39
40
41
42
43
44
45
46
47
48
49
50
51
52
53
54
55
56
57
58
59
60
61
62
63
64
65
66
67
68
69
70
71
72
73
74
75
76
// value is the react model we pass
// this is in server side so we have request context
export function resolveModelToJSON(request, parent, key, value) {

while (
typeof value === 'object' &&
value !== null &&
value.$$typeof === REACT_ELEMENT_TYPE
) {
const element: React$Element<any> = value;
// server component or plain html element
try {
value = attemptResolveElement(
element.type,
element.key,
element.ref,
element.props,
);
}
}
// client side component
if (isModuleReference(value)) {
// get file path like "./src/ClientComponent.client.js"
// name is the file export, e.g. name: "default" -> ClientComponent is the default export...
const moduleMetaData: ModuleMetaData = resolveModuleMetaData(
request.bundlerConfig,
moduleReference,
);
// placeholder++
request.pendingChunks++;
// assign an ID for this module
const moduleId = request.nextChunkId++;
// add module meta data to chunk
emitModuleChunk(request, moduleId, moduleMetaData);
// cache
writtenModules.set(moduleKey, moduleId);
// return id as a reference
return serializeByValueID(moduleId);
}
}

function attemptResolveElement(
type: any,
key: null | React$Key,
ref: mixed,
props: any,
): ReactModel {
// ...
if (typeof type === 'function') {
// This is a server-side component.
// render it directly using props and return the result
return type(props);
} else if (typeof type === 'string') {
// This is a host element. E.g. HTML.
// It is already serializable, return it directly
return [REACT_ELEMENT_TYPE, type, key, props];
}
// client component, leave it here
// This might be a built-in React component. We'll let the client decide.
// Any built-in works as long as its props are serializable.
return [REACT_ELEMENT_TYPE, type, key, props];
// ...
}

type ModuleMetaData = {
id: string,
name: string,
};

function resolveModuleMetaData() {
// ...
return {
id: moduleReference.filepath,
name: moduleReference.name,
};
}

客户端组件的输出格式如下:

1
2
3
4
5
6
7
8
9
10
11
12
13
{
$$typeof: Symbol(react.element),
// The type field now has a reference object,
// instead of the actual component function
type: {
$$typeof: Symbol(react.module.reference),
// ClientComponent is the default export...
name: "default",
// from this file!
filename: "./src/ClientComponent.client.js"
},
props: { children: "oh my" },
}

整个过程发生在打包阶段。React 提供了官方的 react-server-dom-webpack loader,可以匹配 ***.client.jsx** 文件并将其转换为 moduleReference 对象。

序列化流程结束时,我们会将代表这棵可序列化 React 树的 JSON 发送给客户端,如下图所示:

RSC 2

发生了三件事:

  1. HTML 标签保持不变。
  2. 服务器组件已完成渲染。
  3. 客户端组件变成了 moduleReference 对象。

Suspense(流式传输)

现在我们已经成功将部分工作移到了服务端,从而可以期望获得更好的渲染性能。由于输出是可序列化的,我们还可以做得更多。目前客户端需要等到整棵 React 元素树从服务端完整接收后才能开始渲染,这期间有大量时间被浪费了。我们可以引入流式传输(Streaming)概念,让这个过程变得渐进式。流式传输意味着服务端在构建过程中会将 React 元素树分片发送给客户端,而不是等到整棵树构建完成后才一次性发送。React 中的 Suspense 特性在实现这一点上起着重要作用。

1
2
3
4
5
6
7
8
9
10
11
12
13
14
15
16
17
18
19
20
21
22
23
24
25
// The Suspense component allows us to wait for the DataFetchingComponent to load
// while showing some fallback content.
// When the DataFetchingComponent is loaded, it will replace the fallback content.
function DataFetchingComponent() {
const [data, setData] = useState(null);

// Fetch data on component mount
useEffect(() => {
fetchData().then(data => setData(data));
}, []);

// If data is not yet fetched, return null
if (!data) return null;

return <div>{data}</div>;
}

function App() {
return (
// Wrap the data fetching component inside the Suspense component
<Suspense fallback={<div>Loading...</div>}>
<DataFetchingComponent />
</Suspense>
);
}

RSC 会在两个地方使用 Suspense 特性来优化性能:

  1. 服务器组件渲染
    服务器组件利用此特性,在组件获取数据或执行重计算尚未完成渲染时,输出一个 Suspense 占位符(Promise)。一旦渲染完成,就将已完成的组件片段推送给客户端,让其填充到树中。

以下是简化版实现:

1
2
3
4
5
6
7
8
9
10
11
12
13
14
15
16
17
18
19
20
21
22
23
24
25
26
27
28
29
30
31
32
33
34
35
export function resolveModelToJSON(
request: Request,
parent: {+[key: string | number]: ReactModel} | $ReadOnlyArray<ReactModel>,
key: string,
value: ReactModel,
): ReactJSONValue {
// Resolve server components.
while (
typeof value === 'object' &&
value !== null &&
value.$$typeof === REACT_ELEMENT_TYPE
) {
// TODO: Concatenate keys of parents onto children.
const element: React$Element<any> = (value: any);
try {
// Attempt to render the server component.
value = attemptResolveElement(
element.type,
element.key,
element.ref,
element.props,
);
} catch (x) {
if (typeof x === 'object' && x !== null && typeof x.then === 'function') {
// Something suspended, we'll need to create a new segment and resolve it later.
request.pendingChunks++;
const newSegment = createSegment(request, value);
const ping = newSegment.ping;
// when x promise is finished, push completed chunk to client side
x.then(ping, ping);
return serializeByRefID(newSegment.id);
}
}
}
}
  1. 客户端组件渲染

记住,当服务端将 React 元素树发送给客户端时,客户端组件尚未渲染,因此它们会先进入 Suspense 状态,直到客户端将其渲染完成。

Suspense 与流式传输特性使浏览器能够在数据就绪时增量渲染内容。

你可能好奇,一棵 React 元素树(JSON)是如何变成流的?React 服务器组件使用了一种简单格式来实现这一点,格式如下:

1
2
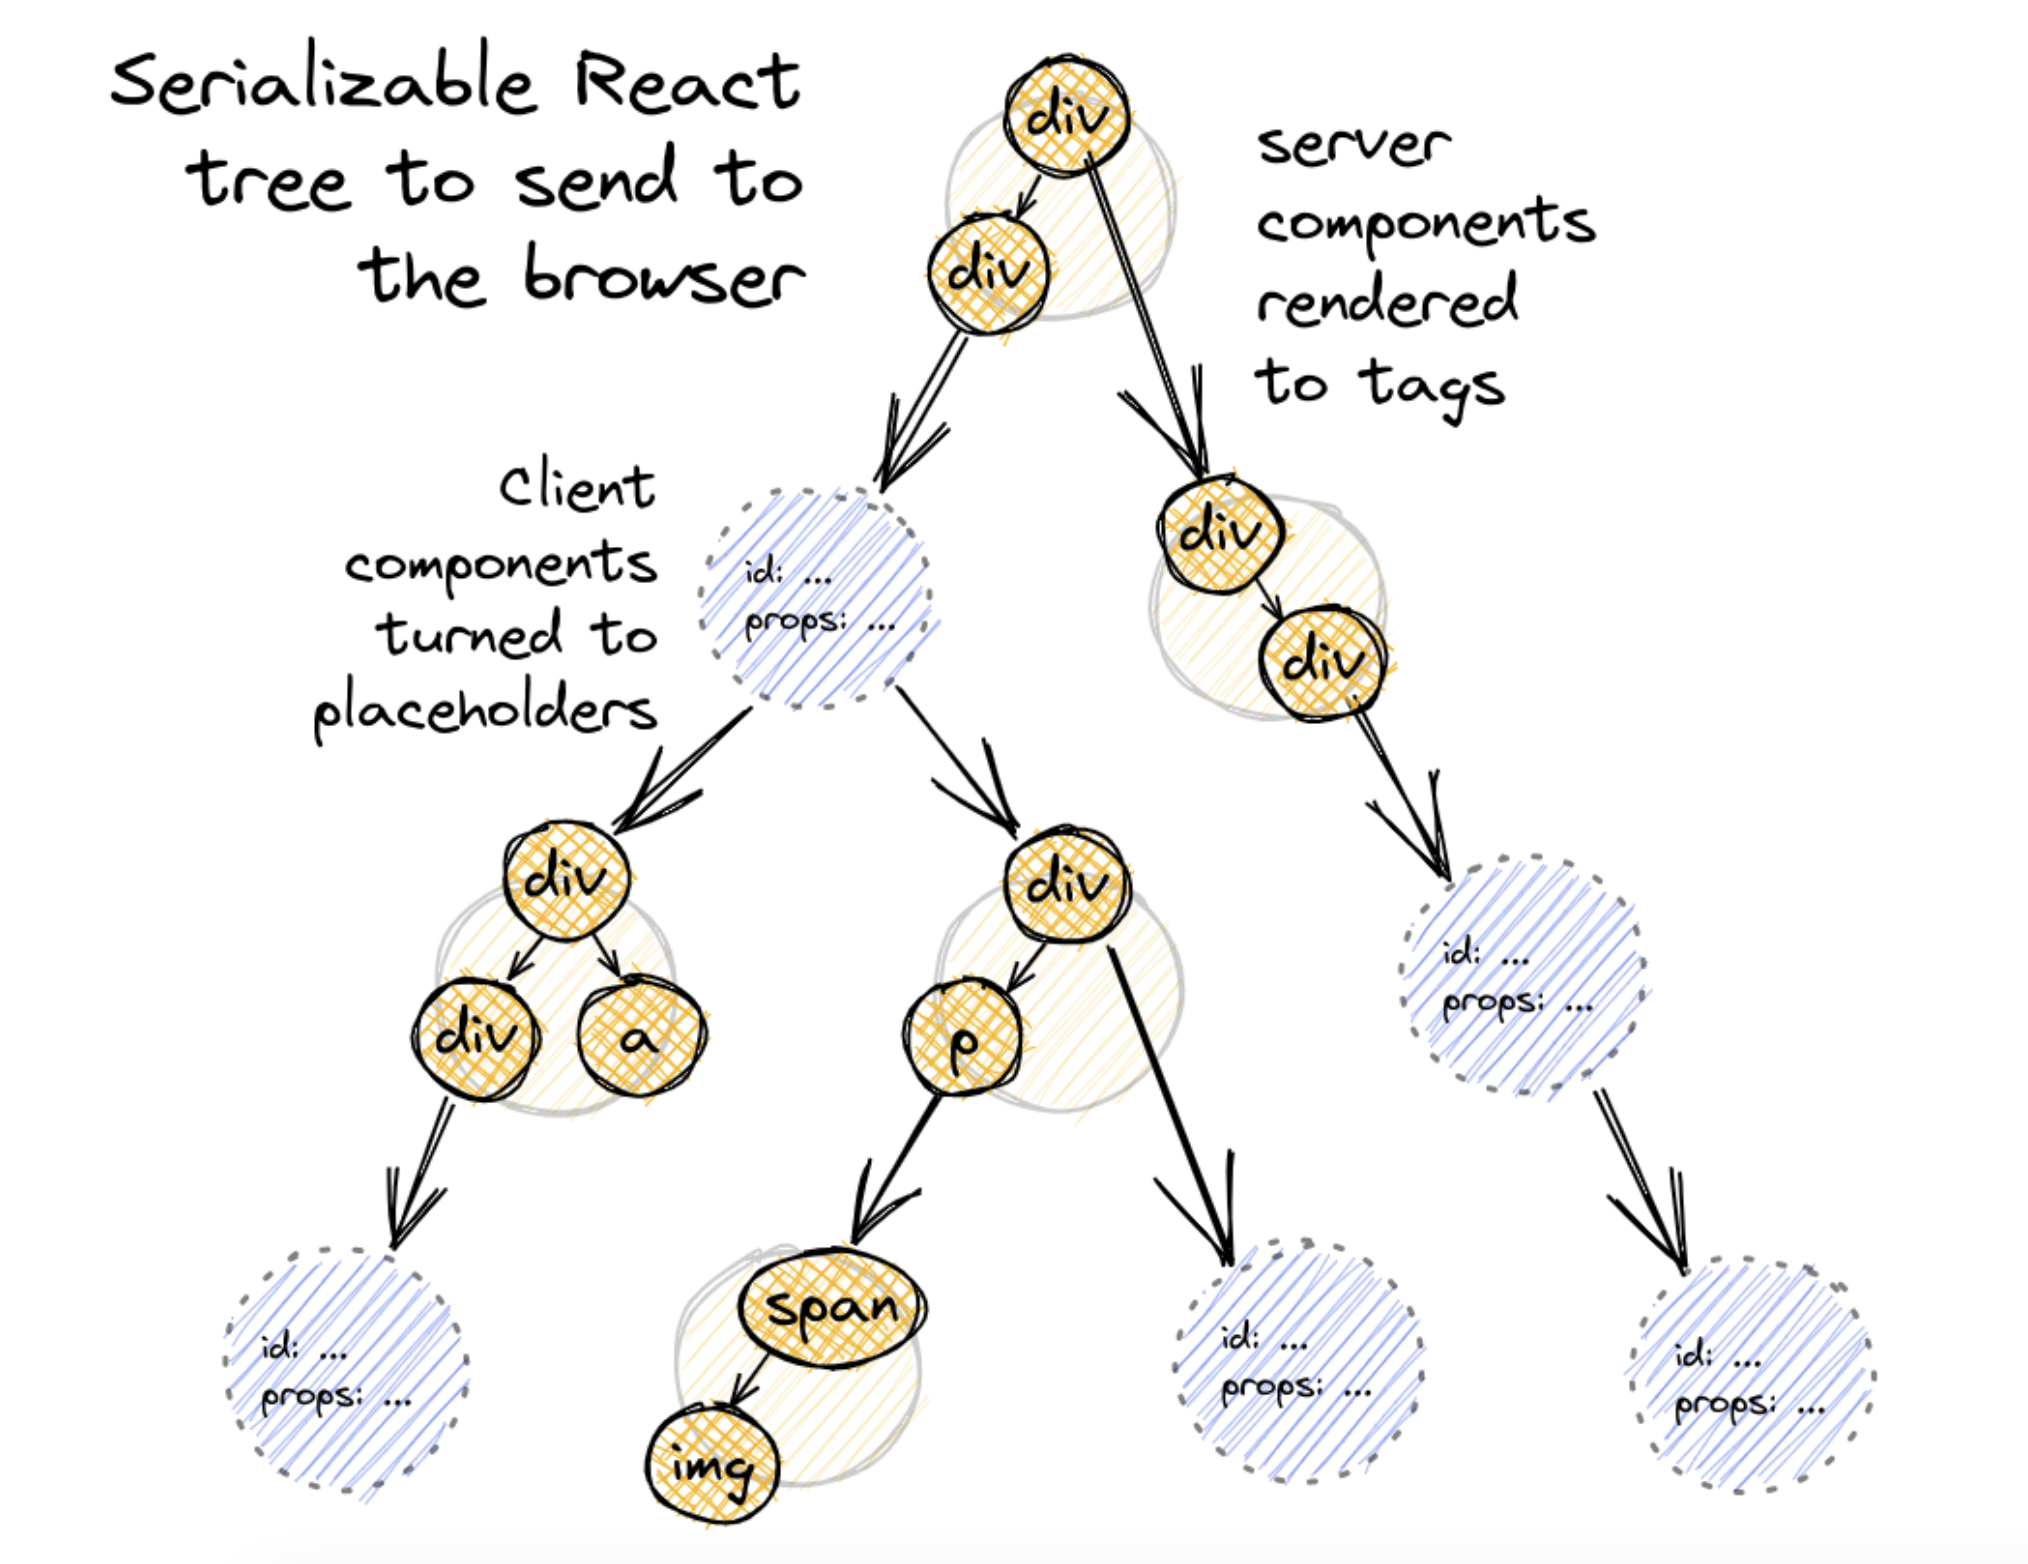
M1:{"id":"./src/ClientComponent.client.js","chunks":["client1"],"name":""}
J0:["$","@1",null,{"children":["$","span",null,{"children":"Hello from server land"}]}]

M 开头的行定义了一个客户端组件的模块引用,包含在客户端 bundle 中查找组件函数所需的信息。

J 开头的行定义了实际的 React 元素树,其中 @1 等引用指向 M 行定义的客户端组件。

这种格式非常适合流式传输——每一行代表一个模块/组件,客户端读取完整的一行后,就可以解析一段 JSON 并取得进展。

1
2
3
4
5
6
7
8
9
10
11
12
13
14
15
16
17
18
19
20
21
22
23
24
25
26
27
28
29
30
31
32
// Tweets.server.js
import { fetch } from 'react-fetch' // React's Suspense-aware fetch()
import Tweet from './Tweet.client'
export default function Tweets() {
const tweets = fetch(`/tweets`).json()
return (
<ul>
{tweets.slice(0, 2).map((tweet) => (
<li>
<Tweet tweet={tweet} />
</li>
))}
</ul>
)
}

// Tweet.client.js
export default function Tweet({ tweet }) {
return <div onClick={() => alert(`Written by ${tweet.username}`)}>{tweet.body}</div>
}

// OuterServerComponent.server.js
export default function OuterServerComponent() {
return (
<ClientComponent>
<ServerComponent />
<Suspense fallback={'Loading tweets...'}>
<Tweets />
</Suspense>
</ClientComponent>
)
}

输出的流格式如下:

1
2
3
4
5
M1:{"id":"./src/ClientComponent.client.js","chunks":["client1"],"name":""}
S2:"react.suspense"
J0:["$","@1",null,{"children":[["$","span",null,{"children":"Hello from server land"}],["$","$2",null,{"fallback":"Loading tweets...","children":"@3"}]]}]
M4:{"id":"./src/Tweet.client.js","chunks":["client8"],"name":""}
J3:["$","ul",null,{"children":[["$","li",null,{"children":["$","@4",null,{"tweet":{...}}}]}],["$","li",null,{"children":["$","@4",null,{"tweet":{...}}}]}]]}]

J0 现在包含了一个 Suspense 边界,边界内的 @3 尚未完成渲染并推入流中。RSC 继续将 M4 推入流,当 @3 就绪后,以 J3 的形式推入流中。

客户端重建 React 树

当客户端接收到 React 树流时,会开始渐进式地重建完整的 React 树并渲染为 HTML。

RSC 3

React 在 react-server-dom-webpack 中提供了一个 createFromFetch 方法来渲染 RSC。基本用法如下:

1
2
3
4
5
6
7
8
import { createFromFetch } from 'react-server-dom-webpack'
function ClientRootComponent() {
// fetch() from our RSC API endpoint. react-server-dom-webpack
// can then take the fetch result and reconstruct the React
// element tree
const response = createFromFetch(fetch('/rsc?...'))
return <Suspense fallback={null}>{response.readRoot() /* Returns a React element! */}</Suspense>
}

response.readRoot()/rsc?... 读取流,并渐进式地更新 React 元素树。

, , — Apr 10, 2024